Tuesday, August 30, 2011

Tyler ~ Lake Forest Children's Photography

Does Baby Tyler look familiar to you? If so, it's because he looks SO much like his big brother Jackson who you've seen before HERE. Three-month-old Tyler came to see me for a mini-session on a very rainy and very gloomy Saturday. Luckily, Tyler had lots of smiles and other funny faces to lighten things up, and I had some supplemental lighting ready to do the rest.


I think this last one is what they call "giving me the stink eye." Isn't he fantastic?!?!?

Monday, August 29, 2011

Project Nursery: Step 3

Step 3: Paint (a.k.a. Yikes! Stripes!)

Aside from the vintage book theme, the one thing I have been set on since beginning designs for this nursery is to have some sort of striped accent wall. At first the plan was to paint the entire room yellow and have one wall with white stripes. I soon came to my senses, though, and decided that a completely yellow room, especially one as small as BSv2.0's nursery, would probably subject my newborn baby (and all of his visitors) to a lifetime of headaches. All in all, probably something to be avoided. So. New plan. Creamy white walls and one wall with yellow stripes. Sounds great, right? Right.

Next step. Paint the stripes. Ack! The hubster was all "Are you kidding me? Do you know how hard that is going to be?" And I was all "Yes. But we're doing it anyway. You don't like it? I'll do them myself." To which he was all "No, no. I'll do them, because you won't do them right." Me: "Whatever."

(By the way, conversations like this are why we bought a move-in-ready house and not a fixer-upper.)

So it was after weeks agonizing over the painting of the dreaded much-anticipated stripes that we set off on a little adventure in painting. Come with me, will you? (But be prepared for some pretty gnarly, noisy, and not KSP-worthy images. Just warning you.)

Here's what we started with. My beloved Parisian-themed guest room. Bye-bye Paris Room. You will be missed:


Oh and did you catch that the walls were RED? RED!!! Two coats of high-coverage primer is what it took to cover that stuff. But eventually, the red was no longer. In the process we pondered name choices (but didn't get very far):


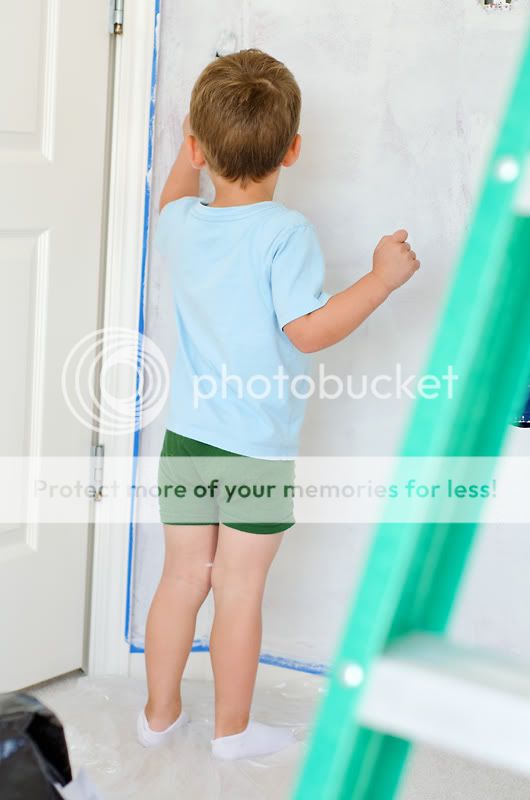
And let Max get in on the action. (Btw, I'm obsessed with his cute little butt in these boxer briefs):


After applying the base coat in a creamy white (a rather boring step, therefore no pictures), it was time to get striping.

A lot of the work was done late at night and we lacked furniture in the room. Who thinks this little bit of balancing trickery was a good idea? Yeah probably not so much:


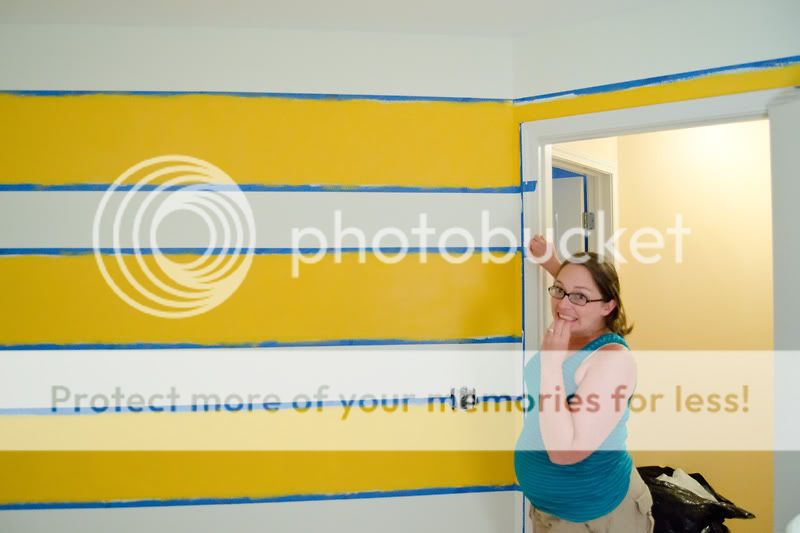
Anyhow, finally we (and by "we," I mean "Adam") started the laborious task of measuring and taping all the stripes:


Why is he doing that on a two-step-high monkey stool? Yeah, we asked the same thing about two minutes later. While he did that I performed a little piece of geniusness of my own (thank you, Google). I painted a thin layer of the base coat over the tape edges to seal off the tape and (hopefully) keep the yellow from bleeding through:


Did it work? We'll find out. Finally, we were all taped off, and Adam looked like this:


Sad Adam.

No time to be sad! The next day it was time to paint! Squeeeee!


Officially, the color is Golden Moon, but I like to refer to it as Velveeta Shells and Cheese. Yum!

Two coats of yellow later, it was tape peeling time. We were so skeeeeered! (Get it? That's my skeeeeered face):


And how did the stripes turn out? Wouldn't you like to know.

Drum roll.................
.
.
.
.
.
.
.
.
.
.
.
Are you ready for it?
.
.
.
.
.
.
.
.
.
Wait for it.
.
.
.
.
Wait for it.
.
.
.
.
.
.
.
TAH DAH!!!!!!!!!


Do you LOVE them? Well, even if you don't, I DO LOVE THEM!!!!! They are so exactly my vision. I just love the brightness of the yellow and I'm super pleased that I picked this wall so that the stripes extend around the little angle in the doorway. I can't wait to get the furniture in the room and start getting the wall decor organized and ready to go up. But first, it's on to the next step: textiles. Oo la la, right? I know. So exciting!

Sunday, August 28, 2011

Baby Rocket Turns One ~ Northbrook Baby Photography

I first met Derek, a.k.a. Baby Rocket, a year ago when he was just a wee little one-month-old. Now, a year later, he is faster than a speeding space ship and has a definite mind of his own! Derek was eager to show me his newly-developed walking skills so off we went!


Monday, August 22, 2011

My First Child

It's Pet Week at I Heart Faces. My poor, neglected first child hardly ever makes the blog, so I couldn't ignore the excuse to share him with the world. Bushie Cat has been in our family for seven years now; the first four of which, I'm certain he enjoyed. After Max came along, I'm not so sure. He must have forgiven me to some extent, though, because he still greets me at the door every day and sleeps on my head every night and begs for food (preferably whipped cream or cream cheese frosting) whenever he sees the opportunity. You'd almost think he was a dog (but don't tell him I said that).


(Click on the camera below to see more great pet entries at I Heart Faces this week)


Thursday, August 18, 2011

What to Wear...ahem....Thursday

Wouldn't it be cool if I had posted this on Wednesday, thereby making it What to Wear Wednesday? Yeah, it would be cool. But I didn't. Sooooo.....any-who.

As I'm gearing up for my busiest season of the year (by the way, have you booked your fall session yet? Only a few slots are left!), the question I'm getting a lot is "But what should we wear?" Typically, this is followed up by, "I want us to coordinate but not be matchy matchy. How do I even start?"

The good news is, these are AWESOME questions, and I'm SO GLAD you're asking! One of the most important things YOU can do to make your photos stand out is to style yourself and your family to stand out. Why do all of the photos in magazines and catalogs look so awesome? Because someone styled them that way! But knowing where to start can sometimes be tricky. Here are a few of my suggestions, as well as a handful of "what to wear" boards to get your creative juices flowing!

Tip 1: Remember that color, layers, and accessories are your friends. Pairing a polo and a pair of khakis together is great and easy, but for your portraits, why not go a step further and add a jacket and a hat or some funky shoes? Trust me, the extra step will make all the difference!

Tip 2: Start one of two places. In my opinion there are two places to start: with your child (if you have a daughter, start with her) or with yourself. Why your daughter? Girls (and kids in general) are so easy to dress. There is no end to the cute stuff out there for little ones so putting together something fab is a breeze. Alternatively, why start with yourself? You (and I mean you, moms) are probably the hardest to dress because you are your own worst critic. So if you're really picky about what you wear, try starting by finding an outfit that makes you feel SPECTACULAR then build the rest of your family's style from there.

Tip 3: Consider your location. What location have we discussed using for your portraits? Urban? Country? Beach? Home? Your location should dictate your style so that everything blends seamlessly. You wouldn't wear a cocktail dress to a park would you?

Tip 4: Choose a color palette. Notice I used the word 'palette.' Resist the urge to pick just one color, and instead put together a few complementary shades on which to base your family's wardrobe.

Tip 5: If you really can't figure out where to start, pick ONE ITEM, just one item that you truly love and build around it. In this first design board, for example, I built the entire thing around the girl's green boots. (I want those for me!) I loved them so much, I had to use them. From there, it was a matter of finding clothes for the rest of the family that suited the boots.

Still have questions? Send me your links, your pictures, your huddled masses (okay, not that last bit), and I'll send you my thoughts. Sound like a deal? To get you going, here are a few design boards I put together on Polyvore.com. Check back next week for more style ideas for your session or head on over to Polyvore and put together a design board for yourself!


Fall Pumpkin and Green


Fall in Plum


Fall in Green
p.s. Most of the items in these sets came from Gap, Old Navy, JCrew, Boden USA, or Anthropologie.

Wednesday, August 10, 2011

Vacation, a.k.a. Florida, How I Love Thee ~ Lake County Beach Photography

Finally slogging through some of our vacation photos and wanted to share a few (okay several) of my favorites with you. I rented a Tokina 11-16 f/2.8 from BorrowLenses.com (totally recommend them for equipment rental, btw) and had a great time with it on the beach. I'm thinking a super-wide may need to be on the wish list soon.

Admittedly, some of these are a bit snappity snap, but it's my blog and I'll snap if I want to. And speaking of vacations, how about a little reader poll. What's your favorite vacation spot? This is definitely one of mine:


Project Nursery: Step 2

Next weekend will mark the official deconstruction of our guest room in preparation for BSv2.0's nursery. Gasp! I'm so excited to get started! In preparation, I thought I'd try my hand at a design board to get some of the more important details in one place. Probably not the best design board you've ever seen, but it does the job.


The nursery will be a vintage book theme. I'm hoping to use book illustrations and pages throughout the room, with the focus being a big frame collage above the crib, as well as a kid-friendly book shelf on another wall. As you can see, my recent obsession with yellow will dominate the color scheme, but I'm also bringing in some brown and turquoise accents. On the opposite wall from the crib will be (if the hubs and I don't kill each other doing it) a yellow and white striped accent wall. (Squeeeee! I'm so excited about the accent wall!) This will be where the changing table is and I want to leave part of that space blank to add a canvas wrap of le bebe after he arrives.

You can see vendors for most of these items HERE on my pinterest board. I'll keep you updated on the progress (and whether we survive painting the wall)!

Monday, August 8, 2011

Baby Shores v2.0 Update

It's been forever since I've put a baby page together. I have one for 19 weeks, when we had our big ultrasound, but I haven't scanned the picture. So instead of waiting for me to get my act together, I'll just ahead and say IT'S A BOY!!!!

Now that we have that out of the way. How about Weeks 23 and 24? (Remember, if you click on the bracketed text below the picture, you can read the full text for the accompanying picture).

(This picture was taken by the wonderful Vone Mitchell of Vone Mitchell Photography during a recent photography get together I attended. Don't mind the wrinkled dress, please.)

{24 Weeks}

Also, I don't think I ever shared the next picture. This is how we told our parents that Bambino Numero Dos was on the way. I had the picture made into a puzzle and we sent the puzzle, not completed of course, to each parent. Our mothers opened them and put the pieces (literally and figuratively) together right away. Our fathers, on the other hand, needed a little guidance. My dad didn't even open the package until my sister suggested he probably ought to, and while he was at it, maybe he should put the puzzle together. Sheesh. Dads.

Wednesday, August 3, 2011

Baby Blaz's Book Shower ~ Lake County Baby Shower Photographer

I have a confession to make. I love party planning. No really, I LOOOOOVE party planning. For Max's birthday this year, I threw two parties. And you saw the tea party I threw for no reason, right? Um, yeah.

But here's the thing. It's not my fault. I come by it naturally. It's genetic. My sister loves party planning just as much, if not more than I do, and my mom, while she may not love party planning quite as much as us, she loves making crafty paper things, which works great with the whole party planning dealio. We really should go into biz.

So needless to say, when our dear friend Katie told us all earlier this year that baby number two was on the way, we were all "Heck yes, we get to throw a party! Oh and we're super excited about the baby, too."

We decided to make the shower a book theme (this later became the inspiration for Baby Shores v.2.0's nursery, by the way), and this weekend we got to see everything come together. We used a turquoise and red theme, since Blaz (pronounced like "blaze" but no "e") is a boy bambino, and because the color combo is just so fun. The centerpiece of it all was the food table (there was A LOT of food) featuring food themed for various children's books. We also tormented entertained the guests with a rousing game of Fictionary (get it? It's like Pictionary, but with books. Fictionary. Bwahahaha!)

What a blast. And now that the party is over, there's only one thing left to do: sit back and wait for Baby Blaz to make his arrival! Come on Blaz!


chicago event photography
I designed the invitations (inspired by this one I found on Pinterest) and printed them at Vista Print. The turquoise envelopes came from Paper Source. The milk bottles are repurposed Starbucks latte bottles.

book themed baby shower
When guests arrived they were asked to play an ice breaker game where they had to decode book titles from the synonymous clues we provided. For example, the clue "Place where the footpath terminates" was really "Where the Sidewalk Ends." The adorable favors at the top corner of each place setting were magnets made by my very talented mama.
north shore baby shower photographer
As I said, we went a little over the top with the food. It was SO worth it though.
lake county illinois event photographer
book shower photos

vintage book shower


Mama Katie and big sister Nora. Aren't they beautiful?

We asked each guest to bring a book to build Baby Blaz's library. I think he will be a great reader some day, don't you?

And last have to share this one of big sister Nora. Pondering big sisterhood, perhaps?